Gamelab Studio generates production-ready spritesheets (PNG images with every animation frame arranged in a grid). Godot Engine is one of the most popular open-source game engines for 2D games, and it has first-class support for exactly this kind of asset. The workflow is straightforward: export your spritesheet from Gamelab, drop it into your Godot project, and configure a node to slice it into frames.
In this guide, we walk through the full process from downloading the spritesheet PNG and its metadata out of Gamelab Studio, to getting a fully animated character playing in Godot 4. We cover two methods: the quick AnimatedSprite2D path and the more flexible Sprite2D + AnimationPlayer path.
What You Get from Gamelab Studio
When you generate a spritesheet in Gamelab Studio, the platform produces a single PNG image containing all of your animation frames laid out in a uniform grid. Every spritesheet comes with built-in metadata that tells you exactly how the grid is structured, no guesswork required. These values map directly to Godot's import settings.
1. Open Your Asset in Gamelab Studio
Navigate to
gamelabstudio.co and open the project containing your spritesheet. If you haven't generated one yet, use the Asset Wizard to create an image, animate it, and extract a spritesheet. The whole pipeline runs inside the app.
2. Download the Spritesheet PNG
Once your spritesheet is ready, click the Download button on the spritesheet card. This saves a single PNG file to your machine, for example, tank_drive.png. The image contains every frame arranged in a grid with consistent cell dimensions.
3. View the Spritesheet Metadata
Gamelab Studio displays the full grid metadata for every spritesheet you generate. There are two places to find it:
On the Spritesheet Card, Click the Metadata button (the ⓘ icon) directly on the spritesheet card. A compact overlay will appear showing all the values you need for Godot.
In the Inspector, Click the spritesheet preview to open the full-screen Inspector. In the toolbar at the top, click the Metadata button to see the same information. The Inspector also has a Grid toggle that overlays numbered frame boundaries directly on the spritesheet image, so you can visually confirm each frame is correct. Switch to Preview mode to see the animation play back frame-by-frame at the configured FPS.
The metadata dialog shows these fields:
- Frame Width / Frame Height — Pixel dimensions of a single frame (e.g. 128 × 128 px)
- Columns — Number of frames per row (e.g. 6). In Godot this maps to
Hframes
- Rows — Number of rows in the sheet (e.g. 4). In Godot this maps to
Vframes
- Frame Count — Total number of animation frames
- FPS — Playback speed (e.g. 10)
- Duration — Total animation length in seconds
- Padding — Spacing between frames in pixels (usually 0)
Keep these values handy—you will enter them into Godot in the next steps.
Method A: AnimatedSprite2D (Recommended)
This is the fastest way to get an animated sprite running in Godot 4. The engine's built-in SpriteFrames editor can slice your sheet automatically using a grid overlay. If you just need a character playing an animation, this is the path to take.
4. Copy the PNG into Your Godot Project
Move or copy the downloaded PNG into your Godot project's directory (for example, res://assets/sprites/). Godot will auto-import the file the next time the editor gets focus.
5. Set Import Preset to 2D Pixel
Select the PNG in Godot's FileSystem dock. In the Import tab on the right, set the preset to 2D Pixel (or manually set the texture filter to Nearest and disable Mipmaps). This prevents Godot from blurring your sprite art with bilinear filtering. Click Reimport.
6. Create an AnimatedSprite2D Node
In your scene, add a new AnimatedSprite2D node. Select it, and in the Inspector on the right, find the Sprite Frames property. Click the dropdown and select New SpriteFrames.
Click on the new SpriteFrames resource and a new panel will appear at the bottom of the editor window.
7. Add Frames from Sprite Sheet
In the SpriteFrames panel at the bottom of the editor, click the grid icon button labeled "Add frames from a Sprite Sheet".
A file dialog will open—select your Gamelab spritesheet PNG. A new window will appear showing your spritesheet with a grid overlay. Set the Horizontal count to the Columns value and the Vertical count to the Rows value from the Gamelab metadata dialog. The grid lines will snap to your frame boundaries.
8. Select the Frames
Click on each frame you want to include in the animation, in order from first to last. If you want all frames, click Select All. Then click the "Add N frames" button at the bottom of the dialog. The number of frames should match the Frame Count shown in the Gamelab metadata.
9. Configure FPS, Looping, and Name
Back in the SpriteFrames panel, set the Speed (FPS) value to match the FPS from the Gamelab metadata (typically 10). Enable the Loop toggle if the animation should repeat. Double-click the animation name on the left side and rename it from "default" to something descriptive like "run" or "idle".
10. Preview and Play
Click the Play button in the SpriteFrames panel to preview the animation in the viewport. You should see your Gamelab-generated character animating. Compare it with the Preview mode in Gamelab Studio's Inspector to confirm the animation looks the same.
To play the animation at runtime, call play() from a script attached to the parent node:
extends CharacterBody2D

@onready var _sprite = $AnimatedSprite2D

func _ready():
    _sprite.play("run")
Method B: Sprite2D + AnimationPlayer
This approach gives you finer control over timing and lets you animate other properties—position, scale, modulate—on the same timeline. It works by telling a Sprite2D node how to slice the sheet, then using AnimationPlayer to cycle through frames.
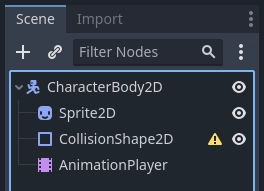
11. Set Up the Scene Tree
Create a scene with the following node structure:
CharacterBody2D
├── Sprite2D
├── AnimationPlayer
└── CollisionShape2D
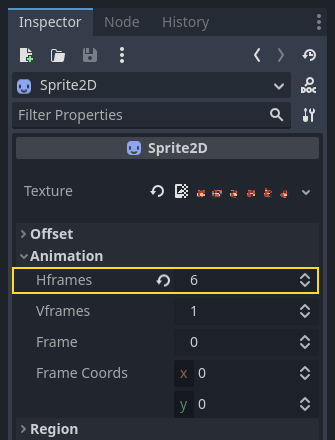
12. Assign the Texture and Slice the Grid
Select the Sprite2D node and drag your spritesheet PNG from the FileSystem dock into its Texture property in the Inspector. The full sheet will display in the viewport. Now expand the Animation section in the Inspector and enter the values from the Gamelab metadata dialog:
- Hframes — Set to Columns from the Gamelab metadata (e.g. 6)
- Vframes — Set to Rows from the Gamelab metadata (e.g. 4)
The viewport will now show only the first frame. Try changing the Frame property to verify each frame displays correctly. The index ranges from 0 to (Frame Count - 1). You can cross-reference this with the numbered grid overlay in Gamelab Studio's Inspector (enable the Grid toggle) to confirm frames line up.
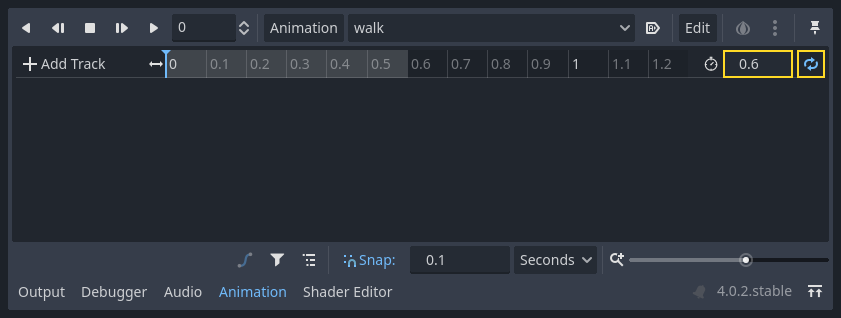
13. Create the Animation
Select the AnimationPlayer node. Click Animation → New and name it (e.g. "run"). Calculate the animation length using the Duration value from the Gamelab metadata, or compute it yourself:
length = Frame Count / FPS
For example, a 24-frame animation at 10 FPS gives a length of 2.4 seconds—which should match the Duration shown in the Gamelab metadata. Enable the Loop button (circular arrow icon) if the animation should repeat.
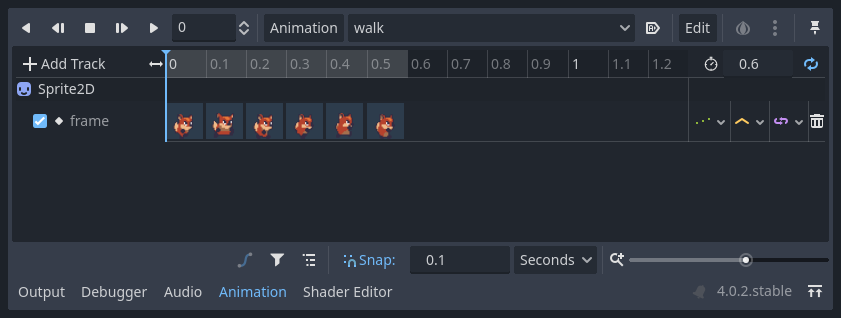
14. Keyframe Each Frame
Select the Sprite2D node. For each frame index, move the timeline cursor to the corresponding time position, set the Frame property, and click the key icon to insert a keyframe. The step size between keyframes is 1.0 / FPS (0.1 seconds at 10 FPS).
After adding all keyframes, you will see the frames displayed across the animation track. Change the track's Update Mode from Discrete to Continuous for smooth playback.
15. Play the Animation
Press Play in the AnimationPlayer timeline to preview. To trigger it from code:
extends CharacterBody2D

@onready var _anim = $AnimationPlayer

func _ready():
    _anim.play("run")
Tips and Best Practices
Use Transparent Backgrounds
When exporting from Gamelab Studio, enable Remove Background before generating your spritesheet. This gives you a transparent PNG that composites cleanly over any game scene. Godot handles PNG alpha natively—no extra configuration required.
Verify with the Inspector Before Exporting
Before you download, use Gamelab Studio's Inspector to sanity-check your spritesheet. Open the Inspector by clicking the spritesheet preview, toggle Grid on to see numbered frame boundaries, and switch to Preview mode to watch the animation play back at the configured FPS. If a frame looks off or the timing is wrong, you can regenerate the spritesheet before bringing it into Godot.
Match the Filter Mode to Your Art Style
For pixel art or low-resolution sprites, set the texture filter to Nearest in the Import tab to keep crisp edges. For high-resolution painterly sprites, the default Linear filter produces smoother results. You can also override this per-node in the Inspector under CanvasItem → Texture → Filter.
Multiple Animations from One Character
Gamelab lets you generate multiple orientations of the same character (front, side, back). Each orientation produces its own spritesheet with its own metadata. In Godot's SpriteFrames editor, click Add Animation to create separate animation entries (e.g. "walk_right", "walk_left", "walk_up") and import each sheet's frames into the corresponding animation. Then switch between them in code:
func update_animation(direction: Vector2):
    if direction.x > 0:
        _sprite.play("walk_right")
    elif direction.x < 0:
        _sprite.play("walk_left")
    elif direction.y < 0:
        _sprite.play("walk_up")
    elif direction.y > 0:
        _sprite.play("walk_down")
    else:
        _sprite.stop()
Automate with the Gamelab MCP Server
If you have the
Gamelab MCP server connected to your editor, you can generate and download spritesheets without ever leaving your IDE. Ask your AI assistant to create an asset, animate it, and extract a spritesheet—it will call the Gamelab API and save the resulting PNG directly into your project folder, ready to import into Godot.
Quick Reference
Use this table to map Gamelab metadata fields to their corresponding Godot properties:
Gamelab Metadata    Godot Property            Where
────────────────    ──────────────            ─────
Columns             Hframes                   Sprite2D → Inspector → Animation
Rows                Vframes                   Sprite2D → Inspector → Animation
Columns             Horizontal frame count    SpriteFrames → "Add from Sprite Sheet"
Rows                Vertical frame count      SpriteFrames → "Add from Sprite Sheet"
FPS                 Speed (FPS)               SpriteFrames panel
Frame Count         Total frames              Verify after import
Duration            Animation length          AnimationPlayer timeline
That is all it takes. Generate your sprites in Gamelab Studio, check the metadata and grid overlay in the Inspector, download the PNG, drop it into Godot, enter the grid dimensions, and hit play. For the full Godot animation documentation, see the
official 2D Sprite Animation tutorial.