Gamelab Studio generates production-ready spritesheets: PNG images with every animation frame arranged in a consistent grid. Unreal Engine can use these spritesheets through Paper2D, Unreal's built-in 2D sprite and flipbook system. The workflow is straightforward: export your spritesheet from Gamelab, import the PNG into Unreal, extract the grid into individual Sprite assets, and combine those sprites into a Flipbook animation.
In this guide, we walk through the full process from downloading a Gamelab Studio spritesheet and reading its metadata, to getting a fully animated Paper2D Flipbook playing inside Unreal Engine. We also cover a material-based flipbook method for effects, UI, planes, and cases where you want to animate the spritesheet directly without creating individual Sprite assets.
What You Get from Gamelab Studio
When you generate a spritesheet in Gamelab Studio, the platform produces a single PNG image containing all animation frames laid out in a uniform grid. Every spritesheet also includes metadata that tells you the exact frame size, number of columns, number of rows, frame count, FPS, duration, and padding. These values map directly to Unreal Engine's Paper2D sprite extraction settings.
1. Open Your Asset in Gamelab Studio
Navigate to
gamelabstudio.co and open the project containing your spritesheet. If you have not generated one yet, use the Asset Wizard to create an image, animate it, and extract a spritesheet. The whole pipeline runs inside the app.
2. Download the Spritesheet PNG
Once your spritesheet is ready, click the Download button on the spritesheet card. This saves a single PNG file to your machine, for example, robot_run.png. The image contains every frame arranged in a grid with consistent cell dimensions.
3. View the Spritesheet Metadata
Click the Metadata button on the spritesheet card, or open the full-screen Inspector and click Metadata in the toolbar. You can also toggle Grid in the Inspector to see numbered frame boundaries directly on the spritesheet, then use Preview mode to confirm the animation timing.
Keep these metadata values handy:
- Frame Width / Frame Height — Use these as Unreal's Cell Width and Cell Height
- Columns — Use this as Num Cells X
- Rows — Use this as Num Cells Y
- Frame Count — The number of Sprite assets you should end up with
- FPS — Use this as the Flipbook playback speed
- Duration — Total animation length in seconds
- Padding — Use this as Spacing X and Spacing Y if your sheet has gaps between frames
Method A: Paper2D Flipbook (Recommended)
This is the best Unreal Engine workflow for animated 2D characters and gameplay sprites. Paper2D extracts each frame from the spritesheet as a Sprite asset, then plays those Sprites in order using a Flipbook.
4. Enable the Paper2D Plugin
In Unreal Engine, go to Edit → Plugins, search for Paper2D, and make sure it is enabled. Restart the editor if Unreal asks you to. Paper2D is included with Unreal Engine, but it may not be enabled in every project by default.
5. Import the Gamelab PNG
Open the Content Browser, click Import, and select the spritesheet PNG you downloaded from Gamelab Studio. Unreal will import it as a Texture asset.
Epic's Paper2D documentation notes that spritesheets are imported first as Texture assets, then converted or extracted into Sprite assets. This is the expected workflow for PNG spritesheets.
6. Apply Paper2D Texture Settings
Right-click the imported texture in the Content Browser and choose Sprite Actions → Apply Paper 2D Import Settings. This applies Unreal's recommended 2D texture settings, including disabling mipmaps and using nearest filtering so low-resolution sprite art does not become blurred.
If your Gamelab sprite is high-resolution painterly art rather than pixel art, you can still adjust the texture filtering later. For crisp pixel art, Paper2D import settings are usually the right choice.
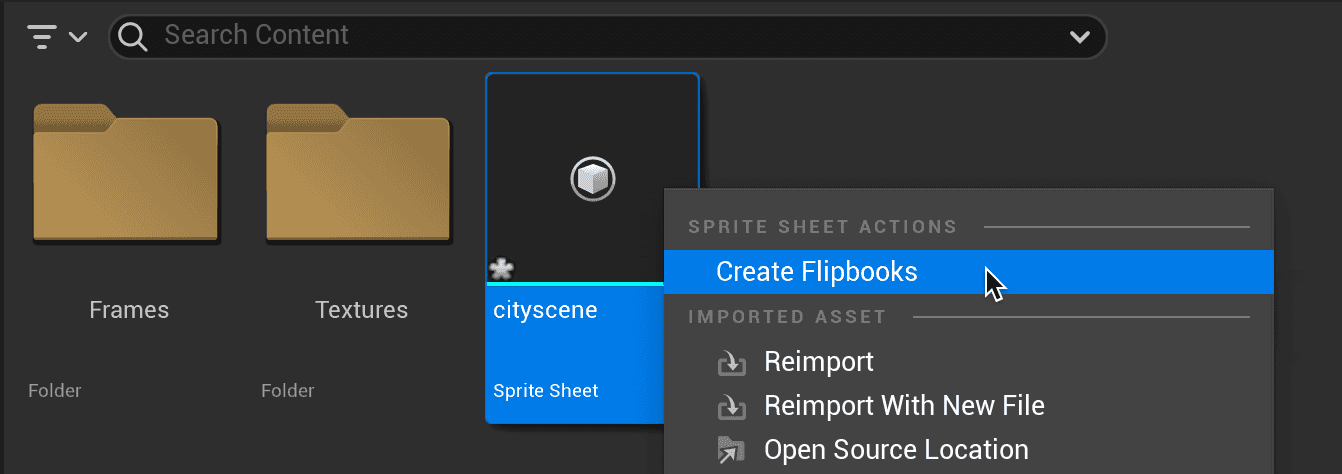
7. Extract Sprites from the Sheet
Right-click the texture again and choose Sprite Actions → Extract Sprites. This opens Unreal's Extract Sprites panel. Set Sprite Extract Mode to Grid, because Gamelab spritesheets use uniform frame sizes.
Enter the values from Gamelab Studio:
- Cell Width — Gamelab Frame Width
- Cell Height — Gamelab Frame Height
- Num Cells X — Gamelab Columns
- Num Cells Y — Gamelab Rows
- Spacing X / Spacing Y — Gamelab Padding, usually 0
- Margin X / Margin Y — Usually 0 unless you intentionally exported a border around the sheet
Unreal extracts sprites from the top-left frame, proceeds left to right, then continues on the next row. This matches the frame order shown by Gamelab Studio's numbered grid overlay.
After extraction, Paper2D's Sprite Editor lets you inspect and edit each frame as its own Sprite asset:
The Edit Source Region view shows how a Sprite maps back to a rectangle inside the original source texture:
8. Choose a Naming Template
In the Extract Sprites panel, set a clear Naming Template, such as:
Robot_Run_{0}
Set Naming Start Index to 0 if you want the first extracted sprite to be named Robot_Run_0. This makes the extracted sprites sort cleanly in frame order, which matters when creating Flipbooks.
9. Click Extract
After the grid lines match your Gamelab frame boundaries, click Extract. Unreal will create individual Sprite assets for each frame. The total number of extracted sprites should match the Frame Count shown in Gamelab Studio.
The screenshot below, from a Paper2D spritesheet workflow, shows how Unreal organizes imported sprites and frames after a spritesheet has been processed:
10. Create a Flipbook
Select all of the extracted Sprite assets in the Content Browser. Make sure they are sorted in frame order. Right-click the selection and choose Create Flipbook. Unreal will create a new Paper2D Flipbook asset from those frames.
Open the Flipbook asset by double-clicking it. In the Flipbook Editor, set the playback speed to match the FPS value from Gamelab Studio. For example, if Gamelab says the spritesheet plays at 10 FPS, set the Flipbook to 10 frames per second.
This Paper2D screenshot shows the kind of Flipbook animation assets Unreal creates from extracted sprites:
11. Preview and Place the Flipbook
Press Play in the Flipbook Editor to preview the animation. Compare it with Gamelab Studio's Preview mode to confirm the timing and frame order match.
The Flipbook Editor viewport previews the animation directly inside Unreal:
The Flipbook timeline shows the sequence of Sprite frames and their timing:
The scrub and playback controls let you preview the Flipbook before placing it in a level or Blueprint:
To add the animation to your level, drag the Flipbook asset from the Content Browser into the viewport. Unreal will create a PaperFlipbookActor. You can also add a Paper Flipbook Component to a Blueprint and assign the Flipbook there.
12. Play the Flipbook from Blueprint
For a character Blueprint, add a Paper Flipbook Component, assign your Gamelab-generated Flipbook, and call:
Set Flipbook
Set Play Rate
Play from Start
Use Set Flipbook when switching between animations like idle, run, attack, or jump. Use Set Play Rate if you want to speed up or slow down the animation at runtime.
Method B: Flipbook Material
Use this method when you want the spritesheet to animate directly inside a Material instead of creating individual Paper2D Sprite assets. This is useful for visual effects, animated decals, UI-like planes, Niagara particles, holograms, and non-character textures.
13. Create a New Material
In the Content Browser, right-click and choose Material. Name it something like M_RobotRun_Flipbook. Open the material.
For sprites with transparency, set:
- Blend Mode — Masked for crisp pixel edges, or Translucent for soft alpha
- Shading Model — Unlit for sprite-style rendering
14. Add the Flipbook Material Function
In the Material Editor, add a Texture Sample using your Gamelab spritesheet PNG. Then add Unreal's Flipbook material function. Epic's material documentation describes the Flipbook function as taking a texture grid, a row count, a column count, UVs, and an Animation Phase value from 0 to 1.
Connect the Flipbook function's UV output into the Texture Sample's UV input. Then connect the Texture Sample color into the material's color output, and the Texture Sample alpha into Opacity or Opacity Mask depending on your Blend Mode.
Unreal's Material Editor can sample the spritesheet and drive the animation through UVs, which is useful when the spritesheet is part of a VFX or surface material instead of a Paper2D character:
15. Enter Rows, Columns, and Playback Speed
Use the Gamelab metadata:
- Number of Columns — Gamelab Columns
- Number of Rows — Gamelab Rows
- Animation Phase — Use a Time node multiplied by a speed value
To match Gamelab's FPS, use this formula for the speed multiplier:
Speed = FPS / Frame Count
For example, a 24-frame spritesheet at 12 FPS should play once every 2 seconds:
Speed = 12 / 24
Speed = 0.5
16. Use the Material on a Plane, Mesh, or Particle
Apply the material to a plane, sprite-like mesh, Niagara renderer, or UI-style surface. This method is not as gameplay-friendly as Paper2D Flipbooks for characters, but it is excellent for looping effects such as fire, smoke, portals, magic bursts, holograms, and animated signs.
One important note: material flipbooks usually play every cell in the grid. If your final row contains unused empty cells, Paper2D Flipbooks are safer because you can select the exact frame count. For material flipbooks, try to export a sheet where Columns × Rows equals the actual Frame Count.
Tips and Best Practices
Use Transparent Backgrounds
When exporting from Gamelab Studio, enable Remove Background before generating your spritesheet. This gives you a transparent PNG that works cleanly with Paper2D Sprites, Flipbooks, masked materials, and translucent materials.
Verify the Grid Before Importing
Before you download, open the spritesheet in Gamelab Studio's Inspector, toggle Grid, and switch to Preview. This lets you confirm the frame boundaries and playback speed before bringing the PNG into Unreal Engine.
Use Grid Extraction for Gamelab Sheets
Unreal's Extract Sprites tool has an Auto mode and a Grid mode. For Gamelab Studio spritesheets, use Grid. Gamelab already gives you exact frame dimensions, so grid extraction is more predictable than alpha-based auto detection.
Keep Sprite Names Sortable
Unreal creates Flipbooks from selected sprites in sorted order. Use a naming template like Run_{0} or Idle_{0} so your frames appear in the same order as the Gamelab grid.
Create Separate Flipbooks for Separate Animations
If you generate multiple Gamelab animations for the same character, such as idle, run, jump, attack, or walk directions, import each PNG and create a separate Paper2D Flipbook. In your Blueprint, switch between Flipbooks based on character state.
Idle     → FB_Robot_Idle
Run      → FB_Robot_Run
Jump     → FB_Robot_Jump
Attack   → FB_Robot_Attack
Automate with the Gamelab MCP Server
If you have the
Gamelab MCP server connected to your editor, you can generate and download spritesheets without leaving your IDE. Ask your AI assistant to create an asset, animate it, and extract a spritesheet. It can call the Gamelab API and save the PNG directly into your Unreal project folder.
Quick Reference
Use this table to map Gamelab Studio metadata to Unreal Engine settings:
Gamelab Metadata    Unreal Paper2D Setting                  Where
────────────────    ──────────────────────                  ─────
Frame Width         Cell Width                              Extract Sprites → Grid
Frame Height        Cell Height                             Extract Sprites → Grid
Columns             Num Cells X                             Extract Sprites → Grid
Rows                Num Cells Y                             Extract Sprites → Grid
Padding             Spacing X / Spacing Y                   Extract Sprites → Grid
Frame Count         Number of extracted Sprite assets        Content Browser
FPS                 Flipbook playback speed                  Flipbook Editor
Duration            Flipbook length                          Verify after setting FPS

Gamelab Metadata    Unreal Material Flipbook Setting         Where
────────────────    ───────────────────────────────         ─────
Columns             Number of Columns                        Flipbook material function
Rows                Number of Rows                           Flipbook material function
FPS / Frame Count   Time speed multiplier                    Animation Phase input