What You Get from Gamelab Studio
When you generate a spritesheet in Gamelab Studio, the platform produces a single PNG image containing all of your animation frames laid out in a uniform grid. Every spritesheet comes with built-in metadata that tells you exactly how the grid is structured, no guesswork required. These values map directly to GameMaker's import settings.
1. Open Your Asset in Gamelab Studio
2. Download the Spritesheet PNG
warrior_idle.png. The image contains every frame arranged in a grid with consistent cell dimensions.3. View the Spritesheet Metadata
- Frame Width / Frame Height — Pixel dimensions of a single frame (e.g. 128 × 128 px). In GameMaker this maps to the frame size in the Convert to Frames dialog
- Columns — Number of frames per row (e.g. 6). In GameMaker this maps to
Frames per row - Rows — Number of rows in the sheet (e.g. 4)
- Frame Count — Total number of animation frames. In GameMaker this maps to
Number of framesand theimgnumargument insprite_add() - FPS — Playback speed (e.g. 10). In GameMaker this maps to
Frame Speedin the Sprite Editor - Duration — Total animation length in seconds
- Padding — Spacing between frames in pixels (usually 0)
Method A: Strip Image Import (Fastest)
This is the fastest way to get an animated sprite running in GameMaker. If your spritesheet has only one row of frames (Rows = 1), you can use GameMaker's strip image naming convention to auto-import the animation with zero manual configuration. Just rename the file and drag it in.
4. Rename the PNG with the Strip Suffix
_stripN where N is the total number of frames. Check the Frame Count value from the Gamelab metadata and rename your downloaded PNG accordingly.
warrior_idle.png → warrior_idle_strip8.png
5. Drag the Strip into GameMaker
- • Detect the
_strip8suffix - • Divide the image into 8 equal-width sub-images
- • Remove the
_strip8from the sprite name (so it becomeswarrior_idle) - • Open the Sprite Editor showing all frames in the timeline at the bottom
6. Set the Frame Speed
7. Set the Origin
8. Assign to an Object and Run
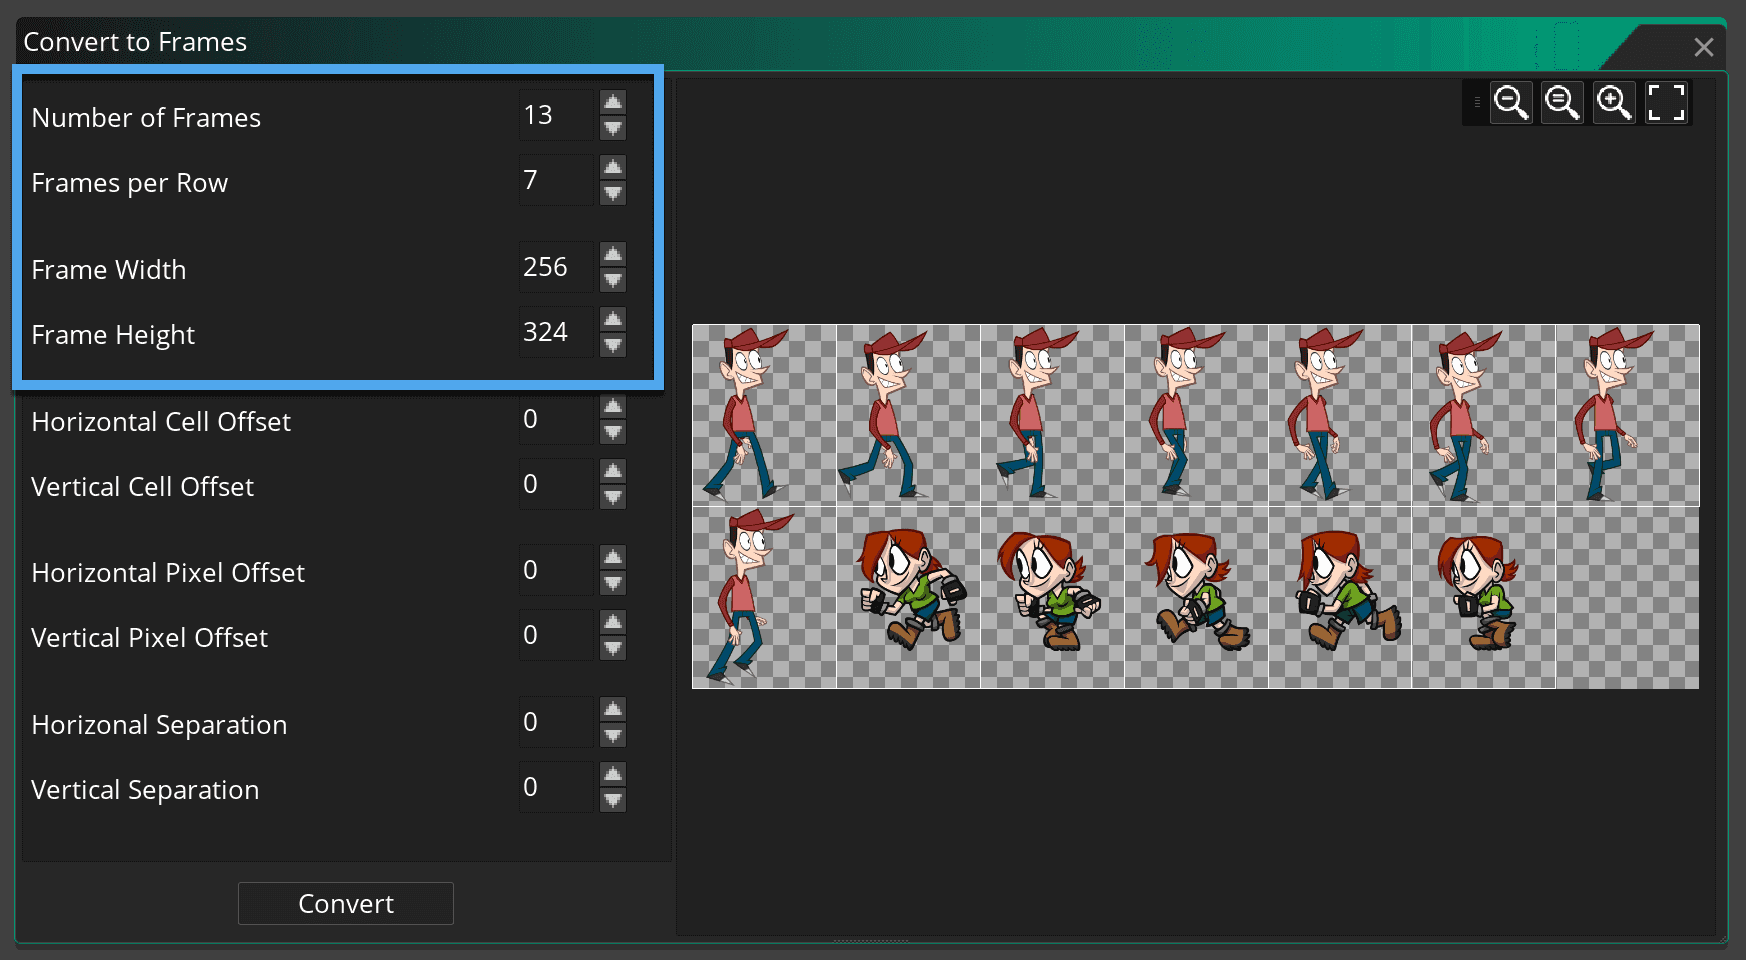
Method B: Convert to Frames (For Grid Layouts)
If your spritesheet has multiple rows (a grid layout), the strip naming convention won't work because it only handles horizontal strips. Instead, use GameMaker's Convert to Frames dialog which lets you specify the exact grid dimensions. This method works with any spritesheet layout Gamelab produces.
9. Import the PNG Without the Strip Suffix
warrior_idle.png)—do not add a _stripN suffix. In GameMaker, right-click the Sprites folder in the Asset Browser, select Create → Sprite, name it (e.g. spr_warrior_idle), then click Import and select your PNG file. The full spritesheet will load as a single frame.
10. Open the Image Editor
11. Convert to Frames
- Number of frames — Set to Frame Count from the Gamelab metadata (e.g. 24)
- Frames per row — Set to Columns from the Gamelab metadata (e.g. 6)
- Frame width — Set to Frame Width from the Gamelab metadata (e.g. 128)
- Frame height — Set to Frame Height from the Gamelab metadata (e.g. 128)
12. Verify the Frames
13. Configure Frame Speed and Origin
Method C: Import Strip via Inspector
GameMaker also offers an Import Strip button in the Inspector panel when a sprite is selected. This is functionally identical to Method B's "Convert to Frames" but accessible without opening the Image Editor. Select your sprite in the Asset Browser, open the Inspector panel, and click Import Strip. The same dialog appears where you enter frame count, frames per row, and frame size.
Controlling Animation in GML Code
Once your sprite is imported and assigned to an object, GameMaker handles basic animation playback automatically. But for any real game, you'll want code control over animation speed, switching between animations, and detecting when an animation finishes.
Basic Playback Control
image_speed as a multiplier on the Frame Speed you set in the Sprite Editor. A value of 1 plays at normal speed, 0 freezes the animation, and 0.5 plays at half speed:
// Create Event
image_speed = 1;  // normal playback (uses Sprite Editor FPS)
sprite_set_speed():
// Set animation to play at exactly 10 FPS (matching Gamelab metadata)
sprite_set_speed(sprite_index, 10, spritespeed_framespersecond);
Switching Between Animations
sprite_index. Always reset image_index when switching to avoid frame-mismatch glitches:
// Step Event
var _target_sprite = spr_warrior_idle;

if (abs(hspeed) > 0) {
    _target_sprite = spr_warrior_run;
}

if (sprite_index != _target_sprite) {
    sprite_index = _target_sprite;
    image_index = 0;
}
Loading Spritesheets at Runtime
sprite_add() function. The image must be in strip format (all frames in one horizontal row), and you specify the frame count as the second argument:
// Create Event — load a Gamelab spritesheet at runtime
spr_loaded = sprite_add("sprites/warrior_idle_strip8.png", 8, false, false, 64, 64);
sprite_set_speed(spr_loaded, 10, spritespeed_framespersecond);
sprite_index = spr_loaded;

// Clean Up Event — prevent memory leaks
sprite_delete(spr_loaded);
sprite_add() arguments are: filename, number of sub-images, remove background (false for transparent PNGs), smooth edges, x origin, y origin. Set the origin to half the frame width and height for centre-anchoring (e.g. 64, 64 for a 128×128 frame).
Tips and Best Practices
Use Transparent Backgrounds
removeback option set to false—GameMaker will respect the PNG's alpha channel natively.
Verify with the Inspector Before Exporting
Prefix Your Sprite Names
spr_ (e.g. spr_warrior_idle, spr_warrior_run). This makes it easy to distinguish sprites from objects, sounds, and other asset types in your code and the Asset Browser. Sprite names can only contain letters, numbers, and underscores, and must start with a letter.
Choose the Right Collision Mask
Single-Row Spritesheets Are Simplest
_stripN naming convention for instant drag-and-drop import with no manual configuration. Multi-row grids work fine too (via Convert to Frames), but the strip path is fastest.
Multiple Animations from One Character
sprite_index:
// Step Event — state-based animation switching
switch (state) {
    case PLAYER_STATE.IDLE:
        if (sprite_index != spr_warrior_idle) {
            sprite_index = spr_warrior_idle;
            image_index = 0;
        }
        break;
    case PLAYER_STATE.RUN:
        if (sprite_index != spr_warrior_run) {
            sprite_index = spr_warrior_run;
            image_index = 0;
        }
        break;
    case PLAYER_STATE.ATTACK:
        if (sprite_index != spr_warrior_attack) {
            sprite_index = spr_warrior_attack;
            image_index = 0;
            image_speed = 1.5;  // play attack faster
        }
        break;
}
Automate with the Gamelab MCP Server
Quick Reference
Use this table to map Gamelab metadata fields to their corresponding GameMaker properties:
Gamelab Metadata    GameMaker Property              Where
────────────────    ──────────────────              ─────
Frame Count         _stripN suffix (N)              Filename for strip import
Frame Count         Number of frames                Convert to Frames dialog
Columns             Frames per row                  Convert to Frames dialog
Frame Width         Frame width                     Convert to Frames dialog
Frame Height        Frame height                    Convert to Frames dialog
FPS                 Frame Speed (FPS)               Sprite Editor → Frame Speed
Frame Count         imgnum argument                 sprite_add() function
FPS                 sprite_set_speed() value        GML Code (runtime)
Choosing Between Methods
Scenario                              Recommended Method
────────────────────────────────      ──────────────────
Single-row spritesheet (Rows = 1)     Method A: Strip Image (_stripN)
Multi-row grid spritesheet            Method B: Convert to Frames
Quick import from Inspector panel     Method C: Import Strip button
Loading sprites at runtime            sprite_add() in GML code